Thursday, 29 September 2016
Wednesday, 28 September 2016
Crankshaft pulley removal and replacement

The term "pattern failure" literally means a failure along a pattern, which is a similar and repeatable failure both in time and nature. Many of the typical auto parts failures discussed in car-care articles are of a design-specific nature; that is, certain part designs tend to fail along a pattern, irrespective of vehicle make and model.
Pattern failure explained
All air filters, regardless of vehicle make and model, will eventually get clogged with dirt and need replacement at more or less specific intervals. All vulcanized rubber engine mounts will eventually compress to the point of failure, due to the constant forces being exerted on them, again at a similar approximate time.
What I'm attempting to do with this series is to show parts pattern failures that I'm personally familiar with and seem to follow along make- and model-specific lines. This approach is solely for your own information, and it is not intended as a critique of any particular auto manufacturer.
In this installment, we'll focus on the frequent failure of crankshaft pulleys – also known as the crankshaft vibration damper – on mid-'90s, Ford-built, four-cylinder engines, such as the older 1.9-liter found in the Escort model. I have also seen similar failures on other Ford engines but, interestingly enough, seldom on the company's V-8 designs.
Two-piece pulley
Many manufacturers use a crankshaft pulley with a two-piece design, consisting of the central "hub," an outer "drive ring," and a high-density rubber composite "absorption layer" sandwiched in between. Variations of this design have been in use for decades with great reliability. It's not uncommon to see original equipment pulleys still in service on '60s-era vehicles.
The nature of the failure of the pulley design considered in this article has to do with a loss of adhesion between the rubber absorption layer and the outer ring, hub or both. In other words, the outer ring, which turns the belt driving the engine's accessory pulleys, slips in relation to the inner ring.
This slippage can sometimes result in a misalignment between the two, which will cause crankshaft pulley wobble, when the pulley visibly "wobbles" with the engine running. It can also cause a constant slip, while the pulley appears to be turning straight and true.
As you can probably imagine, all sorts of trouble would result under such a condition, from low charging system output to poor and inconsistent power steering assist and air-conditioning operation, as well as higher cooling system operating temperatures and operating noise.
I have actually seen such pronounced slippage that, after crankshaft pulley removal, I could induce it while holding the pulley in my hands. That's even more amazing when you consider that the unit was still turning concentrically while mounted on the engine!
Simple replacement
At any rate, replacement of the pulley on this model is a fairly straightforward part of car maintenance, requiring no special tools – although a half-inch drive impact gun is helpful for removal of the crankshaft pulley bolt, and a proper torque wrench is helpful for correctly securing it.
Follow the procedure outlined in the service manual when removing the crankshaft pulley, observing all safety precautions, especially relating to raising and supporting the front of the car. With the right front wheel and splash shield removed, you can see how accessible the pulley is.
This is not uncommon for all makes, especially where early failure of the original part is involved. So it seems that car companies do learn from their mistakes – or at least their pattern failures.
Tuesday, 27 September 2016
Friday, 23 September 2016
Wednesday, 21 September 2016
How to Replace a clutch on your manual transmission
Replacing a manual transmission’s clutch is not for the faint of heart. Yet for experienced mechanics, professionals or seasoned shade tree types, DIY clutch replacement is a good way to save money as long as you're up to the challenge of the variables your vehicle can throw at you. The following should give you a good idea of the difficulties and obstacles involved.
 Considering DIY clutch replacement
For the average auto owner, farming out major repairs is usually wise. Sure, saving on labor charges can be enticing, but hidden costs often undermine good intentions. (As a worst-case scenario, one emergency room trip can make any at-home auto repair extremely non-worthwhile.) Besides, most shops offer some kind of warranty on their work, so the car owner has some recourse should the repair fail within a specified length of time. (Parts warranties can be denied if the manufacturer deems that they were improperly installed by a do-it-yourselfer.)
Circumstances sometimes prompt the hardcore do-it-yourselfer to rise to the challenge of a major car repair. The intent here is to provide an overview of the tools and tricks necessary to replace a clutch in your garage or driveway. Armed with this insight, you can decide whether or not biting off this job will be more than you can chew.
Clutch case history
The demonstration vehicle is a 4WD Isuzu Trooper. It offers a variety of variables not found on all vehicles: two shift levers, the added weight and bulk of a transfer case, a front driveshaft, an exhaust crossover pipe, hydraulic clutch linkage system, undercarriage skid plates, higher-than-average-cost replacement parts and tight access to many bolts (on account of the aforementioned components). The labor quote on a vehicle of this stature can be as much as twice the cost of the parts (which themselves are surprisingly higher than the typical million-selling car). On the plus side, this body-lifted Trooper has oversized tires that create enough clearance under the vehicle to access the necessary parts without having to raise the truck and put it on jack stands. So we simply blocked the tires.

To reiterate, this isn't necessarily a step-by-step how-to on clutch replacement. Instead, it's an overview of some of the challenges to expect if you're considering doing this at home. The clutch job shown here took two weekend mechanics armed with air tools working from 9 a.m.-6 p.m. (including a lunch break) to get the flywheel resurfaced. The bottom line: What's your time worth and are you willing to redo/troubleshoot your work should something not function afterward?
Clutch installation tips
If this primer on clutch replacement hasn't overwhelmed you, and you've got the time and the tools, then it’s time to get started. Tackling a clutch job doesn't have to be all hard work.
Circumstances sometimes prompt the hardcore do-it-yourselfer to rise to the challenge of a major car repair. The intent here is to provide an overview of the tools and tricks necessary to replace a clutch in your garage or driveway. Armed with this insight, you can decide whether or not biting off this job will be more than you can chew.
Clutch case history
The demonstration vehicle is a 4WD Isuzu Trooper. It offers a variety of variables not found on all vehicles: two shift levers, the added weight and bulk of a transfer case, a front driveshaft, an exhaust crossover pipe, hydraulic clutch linkage system, undercarriage skid plates, higher-than-average-cost replacement parts and tight access to many bolts (on account of the aforementioned components). The labor quote on a vehicle of this stature can be as much as twice the cost of the parts (which themselves are surprisingly higher than the typical million-selling car). On the plus side, this body-lifted Trooper has oversized tires that create enough clearance under the vehicle to access the necessary parts without having to raise the truck and put it on jack stands. So we simply blocked the tires.
To reiterate, this isn't necessarily a step-by-step how-to on clutch replacement. Instead, it's an overview of some of the challenges to expect if you're considering doing this at home. The clutch job shown here took two weekend mechanics armed with air tools working from 9 a.m.-6 p.m. (including a lunch break) to get the flywheel resurfaced. The bottom line: What's your time worth and are you willing to redo/troubleshoot your work should something not function afterward?
Clutch installation tips
- Park the vehicle on a level surface.
- Disconnect the negative battery cable.
- If necessary, raise the vehicle and secure it on jack stands to allow enough room to work. Using two floor jacks provides an extra margin of safety.
- Read the clutch kit's instructions and refer to a service manual before beginning.
- A come-along or hand winch can be helpful when rolling the transmission/crossmember away from the engine on a floor jack.
- Accumulate socket extensions of varying lengths as well as socket "wobble" joints.
- Just as brake rotors and drums should be "turned" when replacing pads and shoes, always resurface the flywheel as part of a clutch job. Replace a too-worn flywheel if necessary. Clean any grease off the flywheel before installing the new clutch.
- Once it's removed, inspect the old clutch for signs of other problems. (Oil on the clutch indicates a seal problem on the engine and/or transmission.)
- Indicators of engine/transmission misalignment: uneven wear on the pilot bushing/throwout bearing, clutch surface itself or clutch disc splines, broken clutch retainer plate or springs and uneven wear on a transmission input shaft bearing.
- Common causes of engine/transmission misalignment: broken engine or transmission mounts, warped bellhousing, loose flywheel and damaged bellhousing dowel pins.
If this primer on clutch replacement hasn't overwhelmed you, and you've got the time and the tools, then it’s time to get started. Tackling a clutch job doesn't have to be all hard work.
Sunday, 18 September 2016
How to Replace Struts on Your Car or Truck? DNT Tools

Do you need new struts? If your ride has gotten a little bouncy, or your car is bottoming out with a nice thump over speed bumps or potholes, it may be time for a strut replacement. Most cars have struts in the front, but many cars these days have rear struts, too. It's easy to install new struts, and you can save a ton of money by doing it yourself. If you're not sure what's causing your suspension issues, it's time to do some serious suspension troubleshooting to get to the root of the problem before you pull out your wallet and decide to get greasy.
Before you even pick up a wrench, do a quick comparison to be sure you bought the right part. If what you bought at the parts store doesn't match the strut on your car or truck, you'll be glad you still have a working car to drive back to the parts store to get your new struts!
Be sure your car is securely supported by jackstands, and then remove the wheel. Never work on a car supported only by a jack!
The first real step toward strut replacement is to remove the brake line support, if your car has one. Not all cars will have the brake line supported on the strut assembly. This is an easy one to get off usually. Sometimes it's even just a rubber grommet.
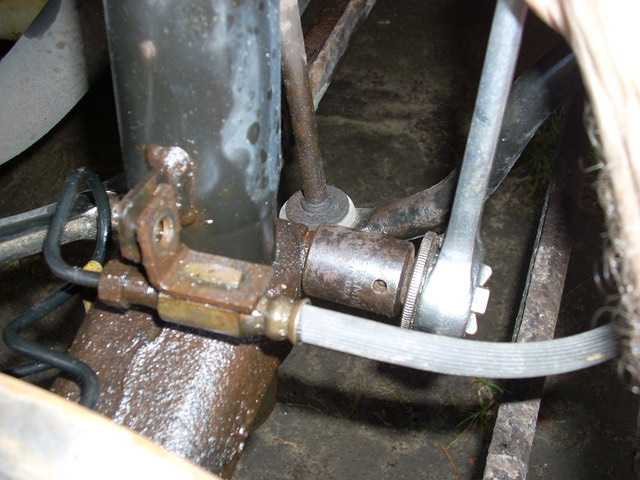
The strut is held on at the bottom by a pinch bolt. This might be a bit of a pain in the neck to get loose, but use a breaker bar if you need a little extra pull on it. Or better yet, get yourself some air tools!

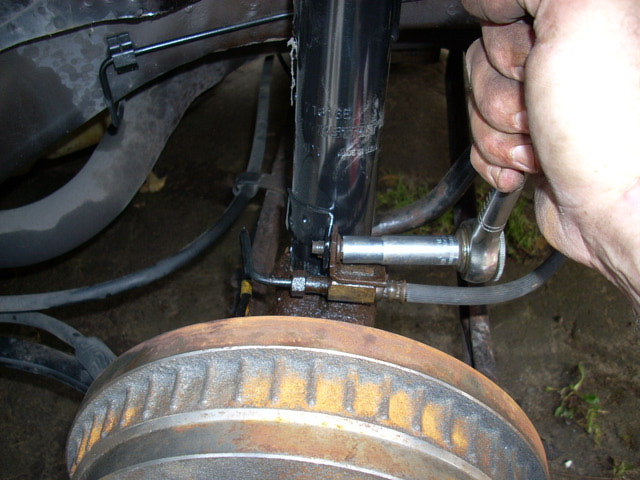
The next step in strut replacement involves dropping the sway bar. You need to do this in order to expose the bar link that connects the sway bar to the strut. It's really just another support for the sway bar, but it connects to the strut so it's gotta come off.

Isn't strut replacement getting fun? It gets a little cleaner at this step at least.
Before you loosen the bolts at the top of the strut housing, you need to put a jack under your brake disc or drum and relieve a little of the pressure on the strut. Don't jack it way up, just enough to support a lot of the strut's (not the whole car's) weight.
The interior bolts will usually be accessible through the trunk.
Sometimes you have to remove some access panels to get to them, but if you take a look at where the top of the strut attaches to the car while you're on the outside, you'll be able to figure out where to get to the bolts on the inside. Remove all of them.

Remove the link that joins the strut and the sway bar, and replace it with the new one. Add a little grease to the joints to keep things lubed. Replacing this link can help you avoid an expensive repair later when the link breaks on its own.

Reinstall the mounting and attachment points in the same manner they were removed. Tighten them to spec and you are ready for some smooth driving! And you saved big money!
Saturday, 17 September 2016
Wednesday, 14 September 2016
Sunday, 11 September 2016
Saturday, 10 September 2016
Wednesday, 7 September 2016
How to replace and install auto carpet?DNT Tools
Just as the carpet in a house gets worn out right in front of the door, the carpet in your car usually gets worn out first on the driver's side. Everything stuck to your feet becomes unstuck and embedded in the carpet. Those same feet eventually wear away the plush fibers, leaving only a threadbare version of a once luxurious carpet. Worse is that everything falling from your or your passenger's hands lands on the carpet, if it doesn't first stain shirts or pants or expensive upholstery. That juicy burger with extra mayo and mustard may not have been such a good idea after all. Drops of catsup, bits of fries, tablespoons or gallon cups of soda – whatever kids can spill.

And don't forget dogs. It all adds up. Winter or heavy rains can also bring moisture into the carpet by way of leaks, adding fuel to the fire, so to speak. If things get to the point where no amount of stinky trees hanging from the mirror or under-seat olfactory cover-ups can mask the unmistakable odor of old carpet, then it may be time for an all-out replacement.
Be prepared
The first step in replacing an auto carpet is finding a replacement. Unlike the carpet on the living room floor, the carpet in a car or truck has to navigate over hills and valleys. The automotive floor is anything but flat. The transmission hump, seat mounts, up onto the firewall – an auto carpet has to be molded to shape. Fortunately there are a few companies that make replacement auto carpets. Easy, right?
Not so fast. While replacing the carpet in a car may seem like a relatively simple task, one must be prepared for a load of work. First, everything on top of the carpet must be removed. Seats. Center consoles. Seat belt anchors. Sill plates. Kick plates. Side panels. Rear seats. Electrical connectors. The list goes on and on. After that's all done, pulling the carpet may present even more work. If any rust or corrosion is found on the floor pan it must be repaired, or at the very least stopped with a rustproof paint. Rust never sleeps. Prepping the floor pan may also involve removing crusty old jute padding and whatever other buried treasure that managed to survive under the carpet. Do not remove any tar-based goop from the floor pan unless you're heading out to the racetrack and you enjoy toasty interior temperatures along with lots of noise. These materials are designed to absorb both sound and heat, and they should be left alone. Mark any disconnected electrical connectors with tape or tags.
The job
Here’s a step-by-step look at how to replace the car carpet.

Step 1: Park the vehicle in a spot that allows full opening of all doors. Set the parking brake. Remove the sill plates.

Step 2: Remove the bolts that hold down the seats, seat belts and anything else on top of the auto carpet.

Step 3: Screws and fasteners may be hiding. Find and remove them first before attempting to pull out things that are still bolted down.

Step 4: Yar, buried treasure! One never knows what might be found. Forty-two cents was better than nothing.

Step 5: With everything on top of the carpet removed, remove the carpet.
Be careful
Once the carpet is removed, careful and well thought out measuring will have to be done before making the first cut and installing the replacement. This will of course vary with the complexity of the interior. Aftermarket model-specific replacement carpets do not usually come with all the holes and cutouts in them required to put the seats, center consoles, stick shift boots and so on back into place. A good method is to attempt to fit the replacement carpet before making the first cut or mark. Mistakes occasionally happen, but no one is going to accept a carpet return once the first cut has been made.
Careful measuring of the floor pan and original auto carpet and marking the replacement with some chalk is the path to take before making the first cut. Measure it twice, cut it once. Do not use a power drill to put holes in carpet. Two things can happen, neither one of them good. Either the threads will quickly wrap around the bit and the carpet thread will unravel like a wool thread from your grandma's sweater, or the bit will grab the carpet, wrap around the drill, and attempt to take your arm with it. It is most certainly the case that obstacles particular to your vehicle and not mentioned here will attempt to block the path to springtime fresh and luxurious carpet. Replacing an automotive carpet is not an easy job, but with methodical patience it can be done.

Step 6: In this case, the floor pan was in good shape. No rust.

Step 7: Vacuum the floor pan to remove any lingering memories.

Step 8: Use the original auto carpet and floor pan measurements to measure, mark and then cut the new carpet. Better to cut too little than too much.

Step 9: On-car trimming may be required. Use a sharp utility or carpet knife.

Step 10: Oil the seat bolts and thread them into the holes before installing the carpet.

Step 11: Use a stapler to install any plastic guides or clips onto the replacement carpet.

Step 12: Find the seat bolts by feel. Cut an "X" on the bolt head. Poke the bolt through the carpet. Using a small screwdriver or pick as a drift pin is another method.

Step 13: Put everything back in the car now that the carpet is in place.

Step 14: Good as new.
And don't forget dogs. It all adds up. Winter or heavy rains can also bring moisture into the carpet by way of leaks, adding fuel to the fire, so to speak. If things get to the point where no amount of stinky trees hanging from the mirror or under-seat olfactory cover-ups can mask the unmistakable odor of old carpet, then it may be time for an all-out replacement.
Be prepared
The first step in replacing an auto carpet is finding a replacement. Unlike the carpet on the living room floor, the carpet in a car or truck has to navigate over hills and valleys. The automotive floor is anything but flat. The transmission hump, seat mounts, up onto the firewall – an auto carpet has to be molded to shape. Fortunately there are a few companies that make replacement auto carpets. Easy, right?
Not so fast. While replacing the carpet in a car may seem like a relatively simple task, one must be prepared for a load of work. First, everything on top of the carpet must be removed. Seats. Center consoles. Seat belt anchors. Sill plates. Kick plates. Side panels. Rear seats. Electrical connectors. The list goes on and on. After that's all done, pulling the carpet may present even more work. If any rust or corrosion is found on the floor pan it must be repaired, or at the very least stopped with a rustproof paint. Rust never sleeps. Prepping the floor pan may also involve removing crusty old jute padding and whatever other buried treasure that managed to survive under the carpet. Do not remove any tar-based goop from the floor pan unless you're heading out to the racetrack and you enjoy toasty interior temperatures along with lots of noise. These materials are designed to absorb both sound and heat, and they should be left alone. Mark any disconnected electrical connectors with tape or tags.
The job
Here’s a step-by-step look at how to replace the car carpet.
Step 1: Park the vehicle in a spot that allows full opening of all doors. Set the parking brake. Remove the sill plates.
Step 2: Remove the bolts that hold down the seats, seat belts and anything else on top of the auto carpet.
Step 3: Screws and fasteners may be hiding. Find and remove them first before attempting to pull out things that are still bolted down.
Step 4: Yar, buried treasure! One never knows what might be found. Forty-two cents was better than nothing.
Step 5: With everything on top of the carpet removed, remove the carpet.
Be careful
Once the carpet is removed, careful and well thought out measuring will have to be done before making the first cut and installing the replacement. This will of course vary with the complexity of the interior. Aftermarket model-specific replacement carpets do not usually come with all the holes and cutouts in them required to put the seats, center consoles, stick shift boots and so on back into place. A good method is to attempt to fit the replacement carpet before making the first cut or mark. Mistakes occasionally happen, but no one is going to accept a carpet return once the first cut has been made.
Careful measuring of the floor pan and original auto carpet and marking the replacement with some chalk is the path to take before making the first cut. Measure it twice, cut it once. Do not use a power drill to put holes in carpet. Two things can happen, neither one of them good. Either the threads will quickly wrap around the bit and the carpet thread will unravel like a wool thread from your grandma's sweater, or the bit will grab the carpet, wrap around the drill, and attempt to take your arm with it. It is most certainly the case that obstacles particular to your vehicle and not mentioned here will attempt to block the path to springtime fresh and luxurious carpet. Replacing an automotive carpet is not an easy job, but with methodical patience it can be done.
Step 6: In this case, the floor pan was in good shape. No rust.
Step 7: Vacuum the floor pan to remove any lingering memories.
Step 8: Use the original auto carpet and floor pan measurements to measure, mark and then cut the new carpet. Better to cut too little than too much.
Step 9: On-car trimming may be required. Use a sharp utility or carpet knife.
Step 10: Oil the seat bolts and thread them into the holes before installing the carpet.
Step 11: Use a stapler to install any plastic guides or clips onto the replacement carpet.
Step 12: Find the seat bolts by feel. Cut an "X" on the bolt head. Poke the bolt through the carpet. Using a small screwdriver or pick as a drift pin is another method.
Step 13: Put everything back in the car now that the carpet is in place.
Step 14: Good as new.
Sunday, 4 September 2016
Friday, 2 September 2016
Thursday, 1 September 2016
Subscribe to:
Posts (Atom)