Wednesday 29 December 2021

what is alloy steel? There are ofen display on tools introduced | DNT Auto Tools FAQ

Alloy steel is steel that is alloyed with a variety of elements in total amounts between 1.0% and 50% by weight to improve its mechanical properties. Alloy steels are broken down into two groups: low alloy steels and high alloy steels. The difference between the two is disputed. Smith and Hashemi define the difference at 4.0%, while Degarmo, et al., define it at 8.0%. Most commonly, the phrase "alloy steel" refers to low-alloy steels.

Strictly speaking, every steel is an alloy, but not all steels are called "alloy steels". The simplest steels are iron (Fe) alloyed with carbon (C) (about 0.1% to 1%, depending on type). However, the term "alloy steel" is the standard term referring to steels with other alloying elements added deliberately in addition to the carbon. Common alloyants include manganese (the most common one), nickel, chromium, molybdenum, vanadium, silicon, and boron. Less common alloyants include aluminium, cobalt, copper, cerium, niobium, titanium, tungsten, tin, zinc, lead, and zirconium.


what is alloy steel? There are ofen display on tools introduced | DNT Auto Tools FAQ: what is alloy steel? There are ofen display on tools introduced

Wednesday 22 December 2021

How To Change Your Oil by youself

 Why change your own oil?

One of the cornerstones of do-it-yourself car maintenance jobs is the home oil change. It's a simple process that requires few tools, and it's a sure way to save some money while you avoid the hassle of sitting in a dull waiting room somewhere reading outdated magazines.

More than anything, the basic oil change is a great way to connect with your vehicle and take some control over its maintenance. The time you spend under the hood and under the car affords you an excellent opportunity to look around and see if anything else needs attention.

Money Saved: Between $25 and $75

Time Required: One hour the first time out; 30 minutes on average

Tools Required:

  • Wrench to remove drain plug (box end or socket)
  • Oil filter wrench
  • Oil drain pan
  • Funnel
  • Latex gloves
  • Jack and jack stands or ramps (optional, depends on ground clearance)

Materials Required:

  • Oil
  • Oil filter
  • Replacement drain plug washer (depending on application)

Let's get started.

Steps for changing your oil
  1. Check the type and amount of oil needed
  2. Get together your filter, wrenches, and other supplies
  3. Prepare your vehicle
  4. Locate the oil filter and drain plug
  5. Drain the oil
  6. Tighten the drain plug
  7. Change the oil filter
  8. Add the new oil
  9. Check the oil level
Check the type and amount of oil needed
Before heading to the auto parts store to buy supplies, consult the owner's manual to confirm the type and amount of oil that's required.

The amount is easy. Here, our 2012 Ford Explorer requires 5.7 quarts, so I'll buy six. Five-quart jugs are tempting because they are cheaper than smaller sizes, but I find them heavy and hard to pour steadily. And a huge container of leftover oil will take up a lot of shelf space.

Make sure to match the oil's viscosity to your engine. The 2.0-liter Ford EcoBoost requires 5W-30 oil. If I had read the manual carelessly, though, I could easily have brought home 5W-20 instead. That's the oil specified for the 3.5-liter V6 engine.

Check to see if the manual calls out other specific oil requirements as defined by the by the American Petroleum Institute (API) and the International Lubricant Standardization Approval Committee (ILSAC.) Sometimes synthetic oil is expressly called for. Sometimes it's not necessary. And sometimes its use is implied by additional requirements.


Get together your filter, wrenches, and other supplies
In addition to oil, you'll need an oil filter, an oil-filter removal wrench, a wrench to remove the drain plug, a funnel, a drain pan and some gloves. You may also need to raise the car to gain access, in which case you'll need a floor jack and safety stands, or a pair of purpose-made steel ramps. For this kind of work, never use the flimsy jack that's supplied with the car.

Yes, my funnel is an empty, dry water bottle with the end cut off. Also, my drain pan has a screw-on lid and pour spout, which makes it easier to transport and recycle the old oil. The only other "tools," not shown here, are a T-shirt and grubby jeans.

You can buy filters at the dealership or at an auto parts store. Make sure to ask if you'll need a new drain plug washer. Some dealers automatically include a new washer, if you need one. Others charge extra for it. In this case, I didn't need a new washer, as you'll see later.

I like the sort of filter wrench that engages the serrations on the end of the oil filter. Wrenches like that are available at most auto parts stores for a few dollars and they snap onto the end of any common three-eighth-inch-drive ratchet. There are many sizes, but it's easy to make sure you buy the right one if you match the wrench to the filter right there in the store.

Band-type filter wrenches are more familiar, but they can be frustrating to use if you don't have enough space — especially if the old filter was over-tightened.

Prepare your vehicle
Your engine and its oil should be warm when you get started, but not hot. Let the car sit so the exhaust system cools off some, but don't allow things to go stone cold.

If you need to raise the car for better access, this is a good time to do it. Make sure you install proper safety stands, of course. Oftentimes you don't need to remove tires, but I did it anyway so our photographer, Elon Schoenholz, could have a clear view of things.


If necessary, take off the undercover. Some newer cars have these aerodynamic covers to improve fuel economy and keep things clean. Unfortunately, the covers can hide the engine's oil drain plug and oil filter. Some covers have built-in access hatches and they're usually labeled. Sometimes you have to remove the undercover entirely. The good news for us DIYers is that most cars don't have them. The Explorer does, but it's held in place with four twist-release clips that don't require any tools for removal.

Locate the oil filter and drain plug

Now it's time to locate the oil filter and drain plug. The vast majority of cars have a bottom-mount screw-on filter, such as the one shown here.

In this case, the plug and filter are far apart, meaning I must reposition the drain pan after I drain the oil and before I remove the filter. For this reason, I'm going to completely finish draining and replugging the engine before I work on the filter. If these elements were closer (or if my pan were bigger) I could begin removing the filter while the last of the oil was still dribbling out.

If yours is one of the growing numbers of new cars with a top-mount cartridge filter, the following oil-drain and refill steps are the same, but the filter change process is not. I'll cover the process for changing a top-mount cartridge filter in another piece.


Drain the oil

With the preliminaries out of the way, it's time to drain the oil out of the engine. It's important to place the drain pan under the drain plug — but not directly under it. The angle of the drain plug will cause the oil to stream out at an angle, so I'm offsetting the pan to that side by several inches. If I were doing this outdoors, I would also account for wind. No, really. Those last wispy ribbons of oil can blow around and make a mess.

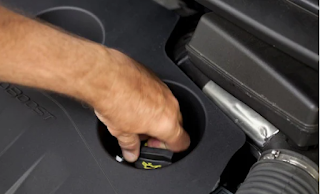
Remove the oil filler cap. You've held your thumb atop a drinking straw filled with water to keep it from running out, right? It's not quite the same here, because oil would still drain with the oil filler cap on, but it does seem to flow out more smoothly and quickly with the cap removed. If nothing else, taking the cap off now serves as a reminder to put the new oil in before you start the engine.


It's time to put the gloves on. When you remove the oil drain plug, things start getting messy.

You can usually remove the drain plug with a common end wrench and a bit of muscle. The hex end on a typical drain plug is almost always a common size that comes in a standard tool assortment, but even the domestic carmakers tend to use metric in the 14-17mm range. A three-eighth-inch drive ratchet is perfectly fine, of course, as long as you remind yourself not to use its extra leverage to over-tighten the drain plug when you put it back later.


Go slowly as you remove the drain plug and keep your hands away from the expected path of the oil. It's going to come out quick and warm. If you miscalculate, it could dribble down your arm. This is another reason why it's best not to change oil when the engine and its oil are piping hot.

I almost got away clean, but not quite. On the other hand, I usually fumble the drain plug into the pan as the oil comes out. Not this time.

Tighten the drain plug
Inspect and clean the oil drain plug while the rest of the oil is draining. This is where the new drain plug washer would go if one were needed. But as you can see, this one has a permanent O-ring instead. If your drain plug does need a replacement washer, make sure the old one isn't stuck to the engine's oil pan — you don't want to inadvertently stack a new washer atop the old one.

Tighten the drain plug. Theoretically, there is a torque specification for drain plugs, but they're almost never published in the owner's manual. Even if you do find the spec, it's unlikely that the half-inch drive torque wrench you bought to tighten lug nuts will go low enough for this job.

The drain plug is properly tightened if you use the box end of a combination wrench and tighten it as much as you can without using a hammer or slipping a pipe over the wrench for extra leverage. A standard-length three-eighth-inch drive ratchet will work if you choke up on it a bit, but anything longer or larger can lead you down the path of over-tightening. You want the bolt to be tight, but you don't want to strip it out.


Change the oil filter
Remove the oil filter. New filters that are properly installed don't go on terribly tight. But they can be hard to get off later because their sealing gaskets swell over time.

Here I've added an extension to my ratchet to get a little extra knuckle room. But I'm not going to use the wrench much beyond the point of breaking the filter free. Filters loosen in a hurry, at which point oil starts to gush out all around the perimeter. Go slowly and switch to unscrewing the filter by hand as soon as you can.

Unlike drain plug removal, there is no way to avoid making a mess at this stage. Make sure you reposition the drain pan before you start. Have rags handy and prepare to get some oil down your arm. Don't let go of the filter once it starts to come off.


Hold the filter over the pan to drain it, but try not to drop it in. It makes a very messy splash.


Use rags to clean as much oil away as you can, paying special attention to the filter sealing surface. Make sure to remove the old filter's O-ring if it stuck itself to the surface. This rarely happens nowadays, but it's one of those things you check anyway because a double stack of O-rings won't seal, allowing your new oil to pump out and ruin your engine.


The last messy step involves smearing a dab of new oil on the new filter's O-ring.


Install the new filter. At this point I like to take the gloves off so I get a good grip. I'm spinning the filter on gently until the O-ring makes first contact with the sealing surface.

Before I tighten the filter, I draw a reference line on it with a marker or paint pen. Generally, oil filters are tightened no more than three-quarters of a turn to a full turn beyond the point where the O-ring first contacts the sealing surface. Consult your manual or the oil filter box to confirm the proper amount.

Here I'm at three-quarters of a turn with no tools. This is enough. You can go to a full turn if you can manage it by hand, but don't resort to a filter wrench just because you want to tighten it more than the recommended amount. In most cases you'll only need a filter wrench for tightening if access is too tight or if your hands are too oily for a solid grip.

Add the new oil
After you reconfirm that the oil drain bolt and filter are both in place and properly tightened, it's time to add oil. Add approximately one quart less than the recommended amount. Ford's EcoBoost 2.0 engine requires 5.7 quarts, so I'm adding five now and holding the last one back for later. I also like to hold the bottles on their side for a smooth pour.


Now it's time to replace the oil cap and start the engine. Run the engine for 30 seconds or so to circulate the new oil, then shut it down and check your work area underneath the car for leaks.

Once you're satisfied that everything is OK, lower the car off the jack stands or ramps.

Check the oil level
Now that you're on flat ground, check the oil level. Because I short-filled it slightly, it was no surprise that I had to add a little more oil. As usual, you'll know the level is full when the oil comes up to the upper hole or hash mark.

The only other step now is to properly dispose of the old oil and filter. Most auto parts stores that sell oil will take your waste oil at no charge. If yours won't, local municipalities often have household hazardous waste drop-off points.

That's it. We're done. Once you've done an oil change a couple times and you are familiar with your car's idiosyncrasies, the whole job takes less than 30 minutes. If you stockpile oil and filters in your garage, you'll save both time and money compared to going to a mechanic. And once you get comfortable with the basic oil change, a whole slew of other maintenance tasks begin to seem within easy reach.


Wednesday 15 December 2021

How to change automatic transmission fluid and filter | DNT Auto Tools FAQ

Check transmission fluid level dipstick
Vehicles' vital fluids normally perform two important functions: lubricating and cleaning. As the fluid circulates through the parts, it gathers the dirt and metal shavings that can accumulate over time. If you're lucky, this debris will settle on the bottom of the pan or housing and not circulate through the system. That’s why some auto shops use machines that perform a transmission fluid flush, ensuring that more of this debris is removed before any new transmission fluid is poured into the vehicle.

Nothing prolongs vehicle life more than regular fluid changes. In automatic transmissions/transaxles, the recommended service interval is about every 30,000 miles or 30 months. (Check your owner's manual or service manual for your car's specifics.) The automatic transmission fluid (ATF) should be changed sooner if its dipstick reveals dark or burnt-smelling fluid.

DIY transmission fluid and filter changes

Even those of us who change our own oil often cringe at the prospect of draining ATF. Because many transmission pans don't have drain plugs, changing the fluid can be a messy proposition – the entire pan must be removed. But even on vehicles that do have drain plugs, the pan still must be removed to change the filter.

Changing transmission fluid is one of those messy jobs that someone has to do. Doing the deed yourself will save money, possibly time and fresh ATF can make your gearbox perform young beyond its years. It’s also relatively easy to determine when your ATF may be low. Consider an automatic transmission service if you detect the following signs of low transmission fluid:

Transmission slips
Transmission shifts roughly
Noisy transmission
No drive engagement in forward or reverse gears
How to change automatic transmission fluid: Step-by-step instructions

If you can garner some initial patience, learning how to change automatic transmission fluid will only benefit you in the long run. More importantly, you’ll need an automatic transmission filter kit; they normally contain a gasket for the pan in addition to the new transmission filter and its O-ring. Along with some basic shop tools, you’re ready to get started.

Automatic transmission filter pan

Step 1: Transmission fluid drains better at operating temperature, so let your car idle for a few minutes first. After turning your ignition off, raise and secure the vehicle. Then, lay down a tarp, some cardboard or a newspaper under at least a two-gallon catch pan. Next, remove the bolts from one side of the transmission pan, being cautious of hot exhaust parts and fluid.

Mechanic loosens bolts on transmission pan

Step 2: Gradually loosen the other bolts, which should allow the pan to tilt and begin to drain. Once all bolts are removed, lower the pan and dump the remaining fluid into the catch pan. Gently break the gasket seal with a screwdriver, if necessary.

Mechanic cleans gasket surface with solvent

Step 3: Clean the gasket surfaces on both the pan and the transmission housing. Inspect the pan for metal shavings or other signs of internal damage, and then clean it with solvent.

Transmission filter and o-ring

Step 4: Remove the old transmission filter and O-ring. The filter contains fluid, so keep the drain pan underneath.

Mechanic installs new transmission filter

Step 5: Install the new transmission filter, making sure that its O-ring seats in the appropriate orifice.

Mechanic attaches new gasket to pan with oil-soluble grease

Step 6: Attach the new gasket to the pan with oil-soluble grease – not gasket sealer or adhesive.

Service manual for using thread sealer on transmission pan bolts

Step 7: Refer to the service manual about using thread sealer on any or all of the transmission pan bolts, then screw in all fasteners finger-tight.

Mechanic torques transmission pan bolts

Step 8: Torque the pan bolts to spec in a spiral pattern starting at the center. Maximum torque is often about 12 pounds per foot.

Bottle of Mobil 1™ transmission fluid

Step 9: Lower the vehicle and fill the transmission with the recommended amount of fluid.

Mechanic moving the shifter through all gears to finish up changing transmission fluid

Step 10: Start the vehicle, warm it up, then shut it off and check for leaks. If you don’t detect any leaks, run the vehicle up to operating temperature on level ground, move the shifter through all gears, return to park and check the dipstick while the engine idles.


How to change automatic transmission fluid and filter | DNT Auto Tools FAQ: How to change automatic transmission fluid and filter FAQ | DNT Auto Tools

Wednesday 8 December 2021

Motorcycle Inner blind Bearing Puller Kit | DNT Auto Tools

This tool is professional bearing puller set, solution for motorcycle inner bearing extractor, Suitable to Bearing Inner Diameter Range: 9mm -23mm ( 5 open clamps )
Mean For Use In Removing Sleeve Type Bearings From Diameter 0.36" to 0.9" (9mm-23mm)


  •  Heat Treated Steel, Open clamps by turning handle clockwise to snug against the bearing for pulling out evenly without damage the parts
  • Connect with 1/2" 3/4" male thread water faucet.
Ideal for Automotive flywheel, Motorcycle wheel, Bicycle wheel, Pump bearing generator bearing, Machine bearing etc.. 


Motorcycle Inner blind Bearing Puller Kit | DNT Auto Tools: Motorcycle Inner blind Bearing Puller Kit from Brand:DNT Auto Tools;Model:D2009;Item No:D2009; Product Name:Motorcycle Inner Bearing Puller Kit; Material:Alloy Steel; Hardness:38-42 HRC; Contents:motorcycle blind bearing puller;

Wednesday 1 December 2021

What is shock absorber and when to repair it and which professional tool will to select


What is a shock absorber?

A shock absorber is a mechanical part that sits beneath the wheel arches, and its role is to keep your tyres in permanent contact with the road so that you always have grip when you brake or turn a corner, and also ensures that you have a smooth, comfortable ride.


Why is it dangerous to drive with worn or damaged shock absorbers?


The average driver isn’t aware of the dangers of worn or broken shock absorbers, as they don’t see it or know about its function.Even worse, every time they drive themselves or others, they are at risk of an accident.


Here are the top ten dangers associated with worn/broken shock absorbers:


Reduced braking ability, which means longer stopping distances
ABS and ESP lose their efficiency
Increased risk of skidding on wet roads
Aquaplaning occurs at lower speeds
Less control in windy conditions or when caught in a crosswind
Increased driver tiredness
Increased wear and tear of tyres and other suspension parts
Uneven/oscillating headlight level dazzles on-coming drivers
Increased passenger discomfort
Increased risk of snaking when being towed
So,When you find your shock absorber is broken,Pls repair and replace them as soon as possible.


Top Safety coil spring compressor tool buy guide by DNT Tools | DNT Auto Tools News: 1.How to choose a safe coil spring compressor is very important 
2.Good and right spring compressor tool will save live DNT Tools a China automotive tools manufacturer and wholesaler guide you to buy right spring compressor

Wednesday 24 November 2021

How to Bearing puller maintenance and care | DNT Auto Tools FAQ

How to Bearing puller maintenance and care | DNT Auto Tools FAQ: How to Bearing puller maintenance and care 

We will teach you step by step follow:

1.Inspect the puller before each use to check for any wear or damage.

2.Replace any damaged or worn parts with authorised parts.

3.After each use, store in a case if provided, or in a safe place.

Wednesday 17 November 2021

How to Select a hydraulic system | DNT Auto Tools


How to Select a hydraulic system when you to buy hydraulic puller

When choosing the proper system for a specific application, several points must be considered:


Puller Reach

Puller reach is the available distance between the pulling surface of the jaw and the jaw head

of the puller. This distance varies and decreases as jaws are opened. When choosing a puller,

make certain the reach is sufficient to attach the puller.


Puller Spread

Puller spread is twice the distance from the ram to the pulling surface of the jaw. In choosing

the proper puller make certain the puller has a large enough spread to attach to the object

being removed.


Tonnage

Tonnage is the maximum pulling force that can be safely exerted by the puller. Tonnage may

be estimated by looking at the torque curves. The maximum force exerted in tons should

be seven to ten times the diameter of the shaft in inches. IE: a 1.5 inch diameter shaft

would generally require a 15-ton hydraulic puller.


Pump

The pump must have the adequate oil output and reservoir capacity to power the cylinder.

How to Select a hydraulic system when you to buy hydraulic puller | DNT Auto Tools FAQ: How to Select a hydraulic system when you to buy hydraulic puller

Wednesday 10 November 2021

What's Different Types Of Pullers And The Key Features To Consider

 Trying to remove shaft-mounted components without using the right types of puller can be frustrating and time-consuming. Interference fits, dirt, and corrosion can make the removal process difficult.


Trying alternatives to pullers, such as cutting, torching, or hammering presents clear safety risks. Furthermore, there’s also the likelihood of causing damage to the machine components you are trying to maintain!

Mechanical and hydraulic pullers are great tools for removing components across many different industrial sectors. Smaller types of puller are widely used by technicians in places such as small automotive workshops. Larger higher tonnage models are used throughout heavy industries, such as those shown in the diagram below.

Projects requiring the use of a puller usually involve the maintenance of rotating equipment. Common components to remove include bearings, gears, wheels, pins, bushings, sleeves, couplers, sprockets, and pulleys.
What are the main types of pullers?
There are many different types of pullers available to choose from. If you select one best suited to your application, you’ll get the job done safely, efficiently – and without causing damage.

The most common types of pullers are available in either 3 jaws or 2 jaw configurations. 3 jaw pullers are the most widely used because the extra jaw helps distribute the force more evenly. But where access is limited a 2-jaw puller can be used, provided it is used carefully.

Mechanical and Hydraulic Pullers
Mechanical pullers work by rotating a crossbar which moves the center bolt/force screw towards the shaft.

Hydraulic pullers include an integral hydraulic cylinder that is powered by a pump to apply the required force. The plunger then provides direct, non-twisting application of thrust, which is more effective and more secure.

If you’re looking specifically for tools to remove bearings, there’s a number of dedicated tools designed for this. For example, Enerpac offers bearing pullersbearing separators, and bearing cup pullers.

Internal Pullers
These are used to remove shaft-mounted parts where no spindle support is available. An internal puller is used with an attached slide hammer which allows a high-impact force to be applied.

Features to consider when choosing a puller
Two or three jaws?

As described above, where space permits it is best to use a 3 jaw puller. They are safer and easier to use.

Hydraulic vs mechanical

Hydraulic types of pullers are easier to operate than their mechanical equivalents, but you will need a pump, hose, and gauge. Depending upon the size of the puller, the pump may be powered by hand, air, or electricity.

Reach

The reach is the available distance between the pulling surface of the jaw and the jaw head of the puller. This distance varies and decreases as the jaws open. Enerpac lock grip pullers offer an impressive reach-to-diameter ratio. This is because they include a different method to the cage system that others use. Additionally, the inside profile of the jaws allows for deeper components to be pulled.

Synchronous and Self-Centering Jaws

The synchronous feature of Enerpac lock grip pullers allows all jaws to move simultaneously. Benefits of this feature are that the spindle stays centered on the shaft, misalignment is prevented, set up requires fewer people, and takes and less time.

Locking Mechanism

The locking mechanism helps prevent jaws from slipping off the application during the pulling process. Turning the puller handle locks the jaws onto the application – allowing the shaft mounted component be pulled free when the spindle is turned.

Spread

The spread is simply the diameter that the jaws extend to. Usually up to 25 inches

Tonnage

Pullers are available with a wide range of capacities. The majority of models available range somewhere between 2 and 64 imperial tons. However, specialist 2 and 3 jaw 100-ton puller units are available from Enerpac. These large and heavy products are mounted on a cart with an on-board lift and hydraulic pump.


Buy Puller Sets

Pullers are available to buy individually, or as part of a set. If you expect to carry out different pulling jobs regularly then consider buying a set. A typical set will include the puller, a pump, a hose, and pressure gauge. Master puller sets include not just one puller type but also, cross bearing puller, a bearing separator, and a bearing cup puller.


Wednesday 3 November 2021

How to find a right puller | DNT Auto Tools FAQ

How to find a right puller | DNT Auto Tools FAQ: How to find a right puller

-What are you trying topull? Are you trying to pull a shaft out of something, pull something out of a hole or pull something off a shaft? This will help you determine if you need a push-puller, jaw-type puller, slide hammer or one with internal or external-internal adapters.

-Determine the reach and spread you need. This will make sure your puller is long enough and the jaws, if applicable, open wide enough to exert enough force to pull the object.

-Estimate the force required. Normally, if you account for reach and spread, DNT’s pullers will have enough force. When in doubt, always use the next larger size to account for frozen or rusted parts. 

Now that you’ve determined what you’re trying to pull, find a corresponding puller to finish the job. 

-If you’re pulling something off a shaft, you can use a jaw-type, push-puller, slide hammer or bearing puller with attachment. 

This includes removing a gear, bearing, wheel or pulley

-If your job includes pulling something out of a hole, look for internal pulling attachments coupled with a slide hammer or a push-puller.

This option helps remove internal bearing cups, retainers or oil seals that are press-fitted

-When you need to pull a shaft out of something, look for threaded adapters, internal or external, for use with slide hammers or a push-puller.  

Typically you need these pullers when removing a transmission shaft or pinion shaft from a bore or housing. 

Regardless of puller selected, always keep the tool clean and frequently lubricate the forcing screw fully to extend the tool’s life. With tons of force, we can’t stress safety enough when using pullers. Before using one of our pullers, we recommend reading the DNT safety puller information sheet, found here.

Wednesday 27 October 2021

What's Different Types Of Pullers And The Key Features To Consider

 Trying to remove shaft-mounted components without using the right types of puller can be frustrating and time-consuming. Interference fits, dirt, and corrosion can make the removal process difficult.


Trying alternatives to pullers, such as cutting, torching, or hammering presents clear safety risks. Furthermore, there’s also the likelihood of causing damage to the machine components you are trying to maintain!

Mechanical and hydraulic pullers are great tools for removing components across many different industrial sectors. Smaller types of puller are widely used by technicians in places such as small automotive workshops. Larger higher tonnage models are used throughout heavy industries, such as those shown in the diagram below.

Projects requiring the use of a puller usually involve the maintenance of rotating equipment. Common components to remove include bearings, gears, wheels, pins, bushings, sleeves, couplers, sprockets, and pulleys.
What are the main types of pullers?
There are many different types of pullers available to choose from. If you select one best suited to your application, you’ll get the job done safely, efficiently – and without causing damage.

The most common types of pullers are available in either 3 jaws or 2 jaw configurations. 3 jaw pullers are the most widely used because the extra jaw helps distribute the force more evenly. But where access is limited a 2-jaw puller can be used, provided it is used carefully.

Mechanical and Hydraulic Pullers
Mechanical pullers work by rotating a crossbar which moves the center bolt/force screw towards the shaft.

Hydraulic pullers include an integral hydraulic cylinder that is powered by a pump to apply the required force. The plunger then provides direct, non-twisting application of thrust, which is more effective and more secure.

If you’re looking specifically for tools to remove bearings, there’s a number of dedicated tools designed for this. For example, Enerpac offers bearing pullersbearing separators, and bearing cup pullers.

Internal Pullers
These are used to remove shaft-mounted parts where no spindle support is available. An internal puller is used with an attached slide hammer which allows a high-impact force to be applied.

Features to consider when choosing a puller
Two or three jaws?

As described above, where space permits it is best to use a 3 jaw puller. They are safer and easier to use.

Hydraulic vs mechanical

Hydraulic types of pullers are easier to operate than their mechanical equivalents, but you will need a pump, hose, and gauge. Depending upon the size of the puller, the pump may be powered by hand, air, or electricity.

Reach

The reach is the available distance between the pulling surface of the jaw and the jaw head of the puller. This distance varies and decreases as the jaws open. Enerpac lock grip pullers offer an impressive reach-to-diameter ratio. This is because they include a different method to the cage system that others use. Additionally, the inside profile of the jaws allows for deeper components to be pulled.

Synchronous and Self-Centering Jaws

The synchronous feature of Enerpac lock grip pullers allows all jaws to move simultaneously. Benefits of this feature are that the spindle stays centered on the shaft, misalignment is prevented, set up requires fewer people, and takes and less time.

Locking Mechanism

The locking mechanism helps prevent jaws from slipping off the application during the pulling process. Turning the puller handle locks the jaws onto the application – allowing the shaft mounted component be pulled free when the spindle is turned.

Spread

The spread is simply the diameter that the jaws extend to. Usually up to 25 inches

Tonnage

Pullers are available with a wide range of capacities. The majority of models available range somewhere between 2 and 64 imperial tons. However, specialist 2 and 3 jaw 100-ton puller units are available from Enerpac. These large and heavy products are mounted on a cart with an on-board lift and hydraulic pump.


Buy Puller Sets

Pullers are available to buy individually, or as part of a set. If you expect to carry out different pulling jobs regularly then consider buying a set. A typical set will include the puller, a pump, a hose, and pressure gauge. Master puller sets include not just one puller type but also, cross bearing puller, a bearing separator, and a bearing cup puller.

Wednesday 20 October 2021

How to find a right puller | DNT Auto Tools FAQ

How to find a right puller | DNT Auto Tools FAQ: How to find a right puller

-What are you trying to pull? Are you trying to pull a shaft out of something, pull something out of a hole or pull something off a shaft? This will help you determine if you need a push-puller, jaw-type puller, slide hammer or one with internal or external-internal adapters.

-Determine the reach and spread you need. This will make sure your puller is long enough and the jaws, if applicable, open wide enough to exert enough force to pull the object.

-Estimate the force required. Normally, if you account for reach and spread, DNT’s pullers will have enough force. When in doubt, always use the next larger size to account for frozen or rusted parts. 

Now that you’ve determined what you’re trying to pull, find a corresponding puller to finish the job. 

-If you’re pulling something off a shaft, you can use a jaw-type, push-puller, slide hammer or bearing puller with attachment. 

This includes removing a gear, bearing, wheel or pulley

-If your job includes pulling something out of a hole, look for internal pulling attachments coupled with a slide hammer or a push-puller.

This option helps remove internal bearing cups, retainers or oil seals that are press-fitted

-When you need to pull a shaft out of something, look for threaded adapters, internal or external, for use with slide hammers or a push-puller.  

Typically you need these pullers when removing a transmission shaft or pinion shaft from a bore or housing. 

Regardless of puller selected, always keep the tool clean and frequently lubricate the forcing screw fully to extend the tool’s life. With tons of force, we can’t stress safety enough when using pullers. Before using one of our pullers, we recommend reading the DNT safety puller information sheet, found here.

Wednesday 13 October 2021

How To Test A Tool's Quality At The Hardware Store

How To Test A Tool's Quality at the Hardware Store | DNT Auto Tools FAQ

Buying hand tools can be a confusing—and at times a losing—proposition. When faced with aisles full of putty knives, hammers, utility knives, and other toolbox must-haves, it’s tough to know if you’re really getting the best product for your money. If you’re like most people, you’ve probably purchased a few tools in the past that ended up breaking during use or rusting into a corroded mess soon after you brought them home, and you'd like to avoid that disappointing experience in the future. 

Learn more follow 7 tips:


1. Look Up!

One of the simplest tricks for locating quality tools is to “look on the shelves above eye level,”  Retail stores position mid-quality tools at eye level because those are the tools that most customers purchase—but they may not offer the best bang for your buck. With tools, as with many things in life, higher quality often comes at a slightly higher price. The superior materials and the manufacturing methods used to create better tools add a little to the final cost. Instead of grabbing the first putty knife you see, shift your focus upward. That’s where you’ll find higher-quality tools, 


2. Feel the Weight

When shopping for a quality tool, “take it down off the shelf and feel the weight,”  “A lightweight utility knife might be cheaper, but it might not feel as good in your hand.” Imagine using the tool: Is it substantial enough for you to grip firmly? Typically, a higher-quality tool will be little heavier than a substandard model.

There are exceptions, however. If a tool is used overhead—for example, when a wide taping knife is being used to smooth joint compound on ceilings—a heavy tool can be a burden.  Consider how you will be using the tool, and then factor in whether it’s the best weight for your needs.


3. Look for Tools That Multitask

While higher-quality tools will often cost more, you can actually save money and still get top-notch durability and performance by choosing a tool that multitasks rather than buying many separate tools. “Additional benefits and features just make life easier,” A good example of a multitasking tool is the HYDE 5-in-1 Painter's Tool. This single tool opens paint cans, widens cracks for patching, doubles as a paint scraper or putty knife, and removes wet paint from a roller. Not only will you save money by buying a high-quality multipurpose tool instead of five (or more) individual tools to do the same work, you won’t have to lug around a lot of heavy tools in your tool belt—and you’ll get years of dependable service


4. Know Your Steel

A cheap, flexible tool is probably OK for a small or one-time job, but with repeated use, it can bend without resuming its original shape. Quality materials make for a quality tool. “Carbon steel is great for many hand tools,”  “because it can be hardened to various degrees of rigidity, but there’s a problem—it rusts. The next step up, quality-wise, is stainless steel, which will cost more but won't pose the same issue.”Usually Alloy steel is better than carbon steel, high carbon steel is better than general steel 


5. Consider Comfort

A tool with a poorly designed grip can leave you with aching muscles and tendons, or even blisters, if it doesn’t fit well in your hand. For repetitive-motion tasks, such as scraping paint from a fence or taping a room's worth of drywall joints, “look for a well-formed, cushioned grip that will absorb some of the motion or impact,” 


Ergonomic handles and comfort grips allow you to complete your task without discomfort. Before buying, hold the tool in your hand as you would if you were using it. Does the handle feel good in your grasp? The bottom line: If a tool fits your hand comfortably, you’ll be able to work longer with less wrist and arm fatigue.


6. Look for Full Tang Construction


For example the knife, Perhaps the best indicator that a taping knife or putty knife will stand the test of time is full tang construction, which just means that “the metal in the blade goes all the way from the end of the handle to the tip of the blade,” “It’s one solid piece, so it will hold up better under pressure.”


Partial tang construction, on the other hand—which is often found in cheaper knives—features a tang that extends only a short way into the handle. After a few uses, a partial tang handle is likely to work loose, and then you’re stuck having to buy another knife to complete your project. Full tang knives last longer and offer increased leverage when performing tasks that require lateral pressure on the blade, such as prying a baseboard away from a wall. Sometimes, you can look at the handle of the knife from the side to see if the tang runs all the way to the end of the handle, though knives with overmold grips will fully encase the handle portion of the tang. If a knife is made with full tang construction, it should say so on the packaging.


7. Check Out the Warranty

When a manufacturer is confident that their product is top-notch, they’re more likely to offer a long-term or lifetime warranty against defects. Check the tool’s packaging for an indication that the manufacturer is offering a warranty.