Wednesday 13 May 2020

HOW TO RELEASE A BALL JOINT

YOU MUST REMOVE A BALL JOINT TO PERFORM OTHER REPAIRS
 
A ball joint is used to act as a universal swivel joint that connects the upper or lower control arms to the spindle which is where the axle bearing and wheel is supported. This joint is also responsible for allowing the steering to work as it is the bottom part of the pivot for the spindle. Constructed of a metal housing with a spherical metal ball, the ball joint is designed with the threaded stud attached at one end. This ball joint stud is designed with a slight taper which will lock into a tapered hole which offers a measure of strength when attaching the ball join to the spindle. The ball is trapped inside the housing with enough clearance to move freely without play. Grease is used to lubricant the joint which may have a Zerk fitting that is used to refill the joint at regular service intervals. Most cars today have non-serviceable joints which are equipped with enough grease to last the duration of the ball joint's usability.

To replace or perform repairs on or near the ball joint such as replacing a control arm or a CV axle the ball joint will need to be undone which means taking the nut off of the joint and applying pressure while striking the spindle or control arm bulk head with a hammer. Some ball joints have a cotter pin which is used as a safety device to keep the nut from coming off and the joint coming undone. Other designs have a self locking nut that doesn't require a cotter pin. The most difficult part of removing any ball joint is disconnecting the taper fit stud at the end of the joint. Some ball joints are made into the lower or upper control arm while in other applications the joint can be unbolted separately. It is strongly suggested to have the car aligned after replacing a ball joint.

WHAT GOES WRONG?
 
When the ball joint wears due to usage and the normal travel of steering and suspension parts the joint will have excessive play that will cause problems such as allowing the steering wheel to shake while driving and making popping and clicking noises as the car is being driven and going over bumps. Ball joint wear can also contribute to irregular tire wear.

LET'S GET STARTED
 
The car must be jacked up off the ground and supported on jack stands. You may need to remove the wheel to be able to access the ball joint more freely. There are two styles of ball joint, one faces downwards while the other faces upwards. Each are similar and will require different placement of the breaker bar to undo. We will demonstrate both styles in the guide. All ball joints connections are a tapper fit that must be released to come undone. This guide is for strut style of suspension which has the coil spring encapsulated within the strut. If this job is being done on a live spring style of suspension the lower control arm must be supported using a jack and then slowly lowered once the ball joint has been undone. A live spring suspension is one that has the spring pressed against the lower control arm. This spring is very strong so caution should be used when dealing with this spring.

1. Remove the Cotter Pin

A cotter pin is used to keep the connection between the ball joint and control arm in tact in case the nut comes loose. The nut in the image below is called a castle nut which has 6 places in which the cotter pin can hold the nut from moving. Use a pair of side cutters (dikes) to remove the cotter pin from the castle nut which will enable the nuts removal.


2. Loosen the Castle Nut

Use a 19mm to 22mm wrench or socket to loosen the nut by turning it counterclockwise. These nuts can be fairly tight so make sure the socket or wrench is squarely on the nut before applying pressure to avoid rounding and damaging the nut. Do not fully remove the nut, leave it on the stud about three turns to protect the stud threads when undoing the joint.


3. Release the Ball Joint Taper

Use a large pry bar and wedge it in-between the lower control arm and the spindle bulk head. Make sure the pry bar is in a solid place because you will need to apply pressure to undo the joint.

While applying force downward strike the lower control arm bulkhead to release the ball joint taper. This will take more than one hammer strike to get the ball joint to release in most cases. If you have trouble with this step have a helper apply additional pressure on the pry bar while using a larger hammer to make the strikes. This will "shock" the joint loose and you should feel a pop when the joint releases.

Once the ball joint has released finish removing the lower ball joint nut and continue with the repair. We will demonstrate the upward style of ball joint below.

After the cotter pin has been removed use a 22mm to 24mm wrench to remove the lower ball joint nut by turning it counterclockwise. It is okay if the steering turns during this step.

Once the nut is loose do not remove it completely. Leave the nut on the ball joint stud a couple of turns. This will protect the threads when disconnecting the joint.

Again wedge a large pry bar while apply downward pressure between the spindle bulk head and lower control arm. While still holding the pressure on the ball joint use a hammer to "shock" spindle bulkhead this time. It may take a couple hits of the hammer but hang in there until the ball joint taper releases.

When the ball joint taper joint releases, there will be a noticeable gap between the ball joint dust boot and the spindle. The gap between the ball joint nut and spindle will also be gone.


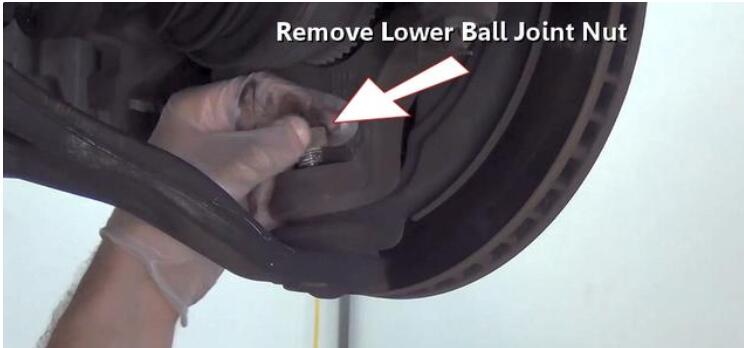
Now you can finish removing the ball joint nut.


4. Disconnect the Control Arm

Grasp the lower control arm while holding the spindle steady. Pull the lower control arm downward to disconnect it from the spindle. At this point the bottom of the spindle will be able to move around freely. This method will work for both upper and lower control arms.


Wednesday 6 May 2020

How to check spark plugs


In times past, one of the easiest maintenance items on a vehicle was checking and changing the spark plugs. That was before engine compartments became shrouded in emissions tubing and computerized sensors. If you’re lucky enough to have an automobile where the spark plugs are relatively easy to reach, take advantage of it. That’s because they offer telltale indications of what’s going on in the combustion chamber and the internal health of your engine.

Before you begin ratcheting out your spark plugs in search of suspicious symptoms, a few words of caution: First, be sure to check all of the plugs. There could be a serious problem brewing in just one cylinder that you wouldn’t want to overlook. Second, if your plugs indicate a problem related to the plug’s heat range or the plug is simply worn out, you can fix these problems with a new, and correct, set of plugs. If the diagnosis is more serious, though, and your plugs are oil-foiled because of a worn piston ring, new plugs won’t make the worn ring go away. Get the vehicle to your mechanic for the overhaul, and then replace the plugs.

The following is a comprehensive list of conditions that you may find useful when you are checking spark plugs:

Normal

When the engine is running the way it should, normal-reading plugs will look pretty much the same way they did when they were new and first screwed into the engine block.

Normal, but with red coating

The red coating is a result of the additives in lower-quality unleaded fuel and will be visible on the plug’s ceramic insulation. The red coating is not an indication of any engine problems.

Fuel fouled

Fuel-fouled plugs may have a shiny coating on the tip and side electrode, which may indicate a too-rich fuel mixture, ignition problems or a plug heat range that’s set too low. First, check to make sure your spark plugs have a heat range that is compatible with your engine (especially if you’ve made performance modifications). This information is available in your vehicle owner’s manual. To resolve the too-rich fuel mixture, have the fuel injection (or carburetor) adjusted to correct the air/fuel mix.

Detonation damage

This plug condition indicates that your engine timing is off and you probably need a tune-up. Another possibility is that the gasoline you’re using does not have a high enough octane rating. Again, check the owner’s manual to verify the manufacturer’s recommendation on octane level.Worn plug

This is an easy fix–replace the plug. Most plug manufacturers indicate the recommended service life on the packaging.

Carbon fouled

If your plug tip and side electrode are blackened, they have been running with too much fuel (or possibly too cool from a stuck-open thermostat). Other sources of the problem may include bad wiring or leaking injectors; in some cases the vehicle has been driven at too slow a speed for extended periods of time. The combustion process is not being allowed to have its natural burning-off, or cleaning, effect.

Preignition

The plug will reveal that the side electrode has been burned away from running too hot. The plug is firing too soon, not enough fuel is present in the air/fuel mixture or there isn’t enough fuel in the combustion chamber for a sound combustion event. Check your fuel injection and timing. Take quick action, because a plug in this condition is just short of falling completely apart.Oil ash fouled

Engine oil is getting to your plugs from worn piston rings or valve guides/seals. Get to your mechanic now.

Mechanical damage

A mechanically damaged plug will look as if it’s been beaten to death by its piston, an indication that it extended too far down into the combustion chamber.

The two most common spark plug problems are hot fouling and cold fouling. The “too hot” category includes the preignition and detonation damage. Some performance improvements may be the cause for this type of plug damage. If your vehicle has performance upgrades such as a high-output coil, ignition, exhaust or cams, these can alter the engine’s recommended plug heat range, so you should consider using a spark plug with a heat range lower than the manufacturer’s recommendations.

A few of the symptoms indicated by your spark plugs have simple fixes–others require the hands and expertise of a qualified mechanic. Eitherway, the main advantage to checking out your spark plugs is for a quick diagnostic tool that gives you a fairly good idea of how well your engine is performing.