Wednesday, 8 November 2017

What do you need to know about brakes?

What do you need to know about brakes?
 Brake Basics


How do brakes work?

Just as your ankle bone is connected to your foot bone, your brake system relies on each connected brake part to function successfully — and safely.


Here’s a quick lesson: By pressing down on the brake pedal, you activate the cylinder that delivers brake fluid to the calipers that then engage your brake pads. Your brake pads then apply pressure to the rotors, creating the friction needed to stop your car. You see, it’s all connected.

All your brake parts work together to perform one important and crucial function: safe and precise stopping power.

What is a Brake Inspection?

Thorough, comprehensive, extensive, and methodical are just a few characteristics that describe our brake inspections. When we say brake inspection, we not only mean it, but we demonstrate it on every automobile we service. Because in order to detect a problem, we need technicians that not only can spot potential problems, but also have the know-how and precision to regain brake awesomeness. When we’re finished, you’ll have total confidence knowing your ride has received a brake inspection that’s hard to match.

Brake Inspection includes checking your brake:
pads (and/or shoes)
calipers
rotors (and/or drums)
wheel cylinders
hardware (springs and adjusters)
hoses
parking brake cables
fluid condition
wheel bearings and grease seals
master cylinder fluid exchange

How often should I have my brakes inspected?

When you visit your doctor for a physical on a yearly basis, you’re being smart about your health. Same goes for your brakes. A yearly checkup will not only give you the confidence and guidance of our expert technicians, it will also provide you with the best opportunity to spot the necessary smaller repairs to avoid the bigger and more expensive ones. If you’re experiencing any warning symptoms, then a more immediate inspection may be required.

Consult your owner’s manual for specific brake inspection intervals for your particular make and model.

What are brake pads?

Brake pads are the parts that contact your rotors and cause friction in order to stop your car.

What’s a rotor?

The rotor is directly connected to each tire. To stop your car, the rotor must stop spinning. It stops spinning by friction created by the brake pad.

What’s a caliper?

The caliper applies pressure and activates brake pads so the pads create contact with the rotors. The caliper requires brake fluid in order to function properly.

What’s a brake hose?

When you press down on your brake pedal, brake fluid travels through the brake hose to each caliper, which puts the brake pads into action.

What exactly is brake fluid?

Brake fluid is a crucial element needed to make your brakes operate successfully. When pressure is generated in the brake fluid lines, energy is distributed to your brake parts so they can perform their main job — stopping your car. If you have a brake fluid leak, your car could take longer to stop or, worse, won’t stop at all. If your vehicle has no brake fluid, you’re brakes won’t even operate. And that’s a scary situation we’d never wish on anybody.

Wednesday, 1 November 2017

How to Check Oil Level in a Car?

How to Check Oil Level in a Car?

Knowing how to check oil level in a car is important for every vehicle owner. Find out what is the normal oil level for your car and how to top up engine oil today.

How to Check Engine Oil Level


After you have a container of the correct type of engine oil for your car you need to be sure that your car is parked on a level surface. If it is not then your readings will not be correct and you might put too much or to little oil in your engine.

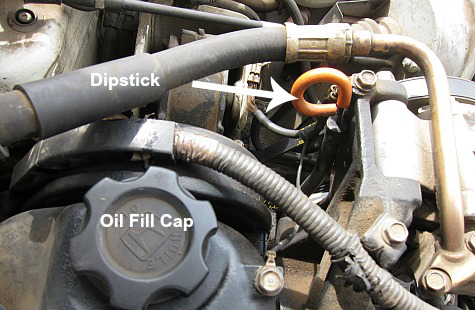
Then you need to find the engine oil dipstick and oil fill cap. The dipstick is typically bright yellow or orange and the oil fill cap will usually have writing on it indicating that it is the oil fill cap.


After you have located the oil dipstick, you need to start your car and let it run for a minute or two. This will make the engine oil warm and will make it easier to read the correct level. Then you need to pull it out and check to see where the oil level is on it. This reading is just an initial reading and will not be super accurate.

After the initial reading you need to wipe off all the oil with disposable towels. Be sure that it is very clean. The cleaner it is, the easier it will be to read the oil level correctly.


How to check oil level in a car: You should have some markings that look similar to the image below. Virtually all manufacturers have their own way of marking the oil dipstick so you may need to read your owners manual to be able to understand yours. In the example below, the normal oil level should be between the two small hole markings:


After wiping the dipstick clean, put it back into the dipstick tube. Make sure that it goes all the way down and seats correctly on the tube. Wait for a few seconds then pull it out again and see where the oil level is. In the image below, the oil dipstick indicates that the oil level is full:


Friday, 27 October 2017

How to Find an Oil Leak?


How to Find an Oil Leak


It’s easy to shrug off an oil stain in your driveway as a minor cosmetic blemish, but what starts out as a little “automotive incontinence” can quickly lead to bigger problems, including (gasp!) irreversible damage to your engine. But how do you know what type of fluid is leaking from your car and what do you do about it? Read on to learn why you should take the time to identify your leak, especially one related to your engine oil, and get tips for what to do when your drips become more than just droplets!

Why should I bother identifying an oil leak?

A teaspoon of oil helps the pistons go down. Yup. Engine oil lubricates the pistons in your engine, ensuring that they glide smoothly within their housing. Without proper lubrication, the pistons will grind against other parts of the engine, generating enormous amounts of heat, i.e. friction. If your engine runs out of oil (because of a leak) the heat generated by the un-lubricated pistons can cause the pieces of your engine to grind together and seize up, causing your engine to stall. Taking a few minutes to identify the source of your leak could mean the difference between something as major as a damaged engine, or something as minor as an empty reservoir of windshield wiper fluid.


How do I find my oil leak?

Step 1: Investigate the leak. Is it even oil?

If you notice spotting in your parking place, it’s time to do some investigating. First, lay down newspaper or a white plastic plate and try to catch some of the drips. Engine oil is an amber color, feels thin and slippery, and has a strong chemical odor, which is what you should look for if you suspect an oil leak.

However, older engine oil can be dark brown to black, with a gritty or gunky texture. (Please note, this is not the ideal state for your oil. Clean engine oil is crucial to the health of your car. Dirty oil is a sure sign that you need to schedule an oil change.)

If the fluid is green, bright orange, or pink and feels sticky, then you may have an antifreeze leak. Not sticky but still one of these colors? Then it’s probably windshield washer fluid, which isn’t a major deal unless you plan on driving through a Saharan dust storm sometime soon. Clear or yellowish fluid?brake Fluid

Pro Tip: While antifreeze is extremely toxic, it has a sweet smell and taste that makes it attractive to many pets. If you suspect an antifreeze leak, do Felix and Fido a favor and get it fixed ASAP. Hose down the driveway or garage floor too!

Step 2: Check your fluid levels, across the board

Next, start checking various fluid levels. Check your oil level by inspecting the dipstick (it often has a red or orange plastic tab on it, under the hood). If you have low oil and you’re pretty sure you’re seeing engine oil drips on your driveway (Remember: look for amber fluid that’s slippery and smells like chemicals), then a leak is likely. If the oil looked more reddish, check the power steering reservoir. Does that fluid need to be topped off?
Step 3: Track down the source

Discovering the source of an oil leak takes a bit of detective work that’s probably best left up to the professionals. However, common sources of leaking engine oil are a damaged oil pan, an old oil filter, or a worn out gasket somewhere on the engine. If you feel like getting a little dirty and donning a trench coat and Sherlock Holmes-esque cap, here are a few tips for tracking down the source of the oil leak:
Turn the engine off and shine a bright light into the engine area. Is oil pretty much everywhere? Could be a slow leak related to the engine’s gaskets.
Now turn the engine on. If oil starts wildly spraying like a little kid with a hose on the Fourth of July, then oil is probably seeping past a worn crankshaft or seal. This type of leak will only be apparent when the engine is running though, writes Popular Mechanics.

Step 4: Visit the oil experts

Luckily, a full service oil change from Firestone Complete Auto Care includes a 19-point inspection (to look for any leaking components) an oil filter change, and a top off on all your car’s vital fluids. Yup, even windshield wiper fluid. Regular, full-service oil changes from Firestone Complete Auto Care are one of the best ways to stay on top of your car’s fluid and engine health. Find your nearest Firestone Complete Auto Care location today and schedule your full-service oil change or oil repair service today! Our ASE-certified technicians may not wear trench coats or caps like Sherlock Holmes, but you can bet they’re super sleuths when it comes to oil leaks and repairs.
DNT Tools 
www.nbdntools.com

Wednesday, 18 October 2017

How to Change Oil Filter in a Car?

                                How to Change Oil Filter in a Car?

1. Remove Oil Filter

 Now that you have everything you need and the car is jacked up enough for you to crawl under it you need to try to loosen the oil filter by hand.

Don't put the drain pan under the car yet. It is big and bulky and just gets in the way. You will most likely need to try different positions in order to get the best torque (twisting force) on the oil filter. Be sure to wear work gloves when you are trying to loosen the filter. These types of gloves will give you extra grip on the filter and they will protect your hands from used oil.

If you cannot get it to loosen then you will need to use a strap wrench. If there isn't enough room for that then you have to resort to oil filter pliers - This is a special tool that will adjust to the diameter of your oil filter and and create a vice-like grip. These work great to loosen very tight oil filters.

2. Drain Oil Filter

After you break it loose, be sure to put the oil drain pan under it before you loosen it any more. After you get the oil drain pan under the oil filter then you can go ahead and loosen it the rest of the way. It is important to have gloves on and to be in a position in which the oil won't run all the way down your arm.
As soon as you get the oil filter off, just take it and put it face down in the drain pan. Look at the mounting surface where the oil filter attaches to the engine. Be sure that the gasket from the old filter is not stuck to it and if it is then remove it. It's also a good idea to clean this surface.

After you move the drain pan out from under the car you will need to tip the oil filter up on its side so all of the oil can drain out. Let the filter drain for 24 hours, then you can throw it in your household trash.

3. Lubricate Oil Filter Gasket

Unpack your new oil filter and use some fresh motor oil to lubricate the gasket on the new oil filter. This will help to ensure a tight and leak-free fit on the engine. If the filter sits straight up and down on the engine, it's a good idea to pre-fill the filter with motor oil too.

The reason for this is because when you first start the engine after the oil filter change there will be virtually no lubrication because the oil pump will have to fill the filter with oil first. If it is already full then you will get lubrication to your engine much sooner.


4. Change Oil Filter

So far you have removed the oil filter, checked that the oil filter sealing surface on the engine is clean and oiled the oil filter gasket on the new one. Now it's time to get yourself into position to put the new filter back on.

At this stage of replacing an oil filter, it is crucial that you keep the top of the oil filter covered as much as possible while lifting it into position. You can do a lot of damage to the engine if dirt or other debris gets into the oil filter.

Once you get it into position start turning it to tighten. Be sure to not put too much pressure on it while you are getting it started. If you put too much pressure on it while turning it you can end up getting it cross-threaded and that would ruin your whole day. This can be an expensive fix.

Just be sure to start it gently. You should be able to feel it start threading on. As soon as it starts threading on I spin it fairly fast. The reason for this is so that I can watch it spin and when it suddenly stops I know that the oil filter gasket has contacted the engine block. This is an important thing to know because you only need to turn it 3/4 of a turn after the initial contact with the engine block.

This step for changing oil filters isn't exact science. If the filter is a little too tight it's not a big deal, but you don't want it to be too loose.


Thursday, 12 October 2017

How Does an Alternator Work?


An alternator's main purpose is to maintain the battery. Basically what happens is that it uses the engine power to create electricity and sends it over to the battery to keep it fully charged. Engine power is sent to the alternator via the engine drive belt, aka serpentine belt. This is why it is so important to keep the belt tight and replace it when needed.

When you are driving your car with all the lights on, the windshield wipers on and the radio blasting it uses a lot of electrical power. If all you had was a battery all of this electricity usage would drain the battery in a matter of minutes (sometimes more like an hour depending on how good your battery is). To prevent this from happening and to keep our battery fully charged, we use an alternator.

Wednesday, 27 September 2017

what is types of spring for your vehicle?


As you drive your car, the wheels and tires come intact with varying types of terrain, including speed bumps, rough patches, potholes and over highway hazards. The up and down motion from this can be highly disruptive to your driving experience but fortunately, modern automobiles are outfitted with springs, which absorb much of this motion and keep your ride as smooth as possible.

These springs are vital to your vehicle’s suspension. As such, if you are doing any kind of work on your suspension, it pays to know how these springs work. It's worth noting that there are different types of springs found within suspensions.Take a moment to familiarize yourself with these four classes of springs—coil springs, leaf springs, coil over springs, and lowering springs.

Coil Springs


Coil springs are the easiest to visualize. They look basically like the typical coiled/spherical springs you’ve seen elsewhere. You’ll find coiled springs most often in older cars and in heavier trucks, specifically on the front suspension between the upper and lower control arms. These springs can carry some really heavy loads, but they don’t necessarily provide the smoothest ride quality, which is why you won’t find them as often in newer, smaller vehicles.

Leaf Springs

Here’s another type of spring that you’re most often going to find primarily in trucks and in older vehicles. These springs actually look like long strips of metal, bowed to allow some rebound. Depending on the load size the vehicle is meant to carry, these springs may be layered. They are found mostly toward the rear of the vehicle, and, again, offer a ride with a fair amount of bounce to it, hence their not being as common in newer or smaller vehicles.

Coil Over Springs

Sitting over a strut carriage, the coiled over spring is probably the best way to get a great performance but also good ride quality. This is highly advanced spring technology, and you’ll find it at the front of almost every new car; for performance vehicles, you’ll find a coil over spring at the front and the back. You may even get a specialty wrench with your vehicle, making it easy to adjust your coil over spring.
 
Lowered Springs

Finally, we come to some aftermarket spring options. The lowering spring lowers the vehicle’s center of gravity and alters the spring rate. These changes can enhance the vehicle’s performance, but can also compromise the quality of the ride and make for a truly difficult and bouncy driving experience. You’ll definitely want to speak with a suspension expert before you make this aftermarket change to your vehicle.

Of course, as with any part of your vehicle, your springs may occasionally require some maintenance. If you notice any problems with your ride quality, make sure to take your vehicle in for an inspection by a suspension care expert.
DNT Tools
mail:info@nbdntools.com

Wednesday, 20 September 2017

What to Do When Your Car Won't Start?


What Does It Mean When Your Car Won't Start

If your vehicle won't start then there is a chance that you would just need a jump start, but before you try that you should verify that your "security" light is not flashing. If it is then your problem probably does not have anything to do with the battery or starter, it is most likely because your security system is not letting it start.

If this is the case then you need to read your owners manual to see how to fix this or contact your dealer. Since all makes and models are different there is no universal way to turn off the security system. If the security light is NOT flashing then you need to start checking the other things that can cause a no start.

To troubleshoot, repair and maintain your vehicle, you'll need diagnostic and repair information that is specific to your car or truck. With full manuals for over 30,000 vehicles online, you will find an exact match for your vehicle's year, make and model.

Besides being cheaper than a factory manual, they also offer step by step repair instructions and detailed diagrams beyond what is found in most printed manuals

What to Do If Your Car Won't Turn Over

If your car will not turn over (make noise and do what it usually does right before it starts) then there are several things to check.

The first thing to check is your battery. There are several ways to do this. The best way is to have it load tested. Most auto parts stores and many repair shops will do this for free. This test is the MOST reliable test to see if your battery is good or not.

If you can't or don't want to do this test, you can try turning on all your accessories (heater, radio, lights, etc.). After they are all on, go out and see how bright the lights are. If they are dim this tells you that the battery is probably not as strong as it should be.

Another good test requires a multimeter (also called a DVOM). These are cheap (under $20) and you can use it to run lots of diagnostics on your car.

After you have your meter, check the battery voltage to see how many volts it has with none of your accessories on and your key off. It should have a MINIMUM OF 12.4 VOLTS. Many people think that a fully charged battery should have 12 volts, but a fully charged battery should actually have approximately 12.6 volts.

The battery is the most common cause if your car won't start. The next most common cause is the battery cables not being tight or they are too corroded. This is an easy thing to check...just try to wiggle them. If they move, then they are too loose. Also look for white or blue buildup on the connections. This is an indication that the cables are corroded.

If your battery is good, the next most common cause if your car won't start is the starter. Many times when the starter starts going out you will hear clicking noises from your engine compartment and sometimes it will take more than one try to get your car to start. If your battery is bad it can cause these same symptoms as well so be sure to check your battery FIRST.

The best way to test your starter (If you have already tested your battery) is to put the multimeter leads on your battery and have someone try to start the vehicle. Read the voltage at this time. If the voltage drops below 9.6 volts then it is likely that your starter is faulty.

If you are having starting problems it is possible that your ignition switch is going bad, but it is very unlikely as they do not go bad very often. This can be diagnosed fairly quickly at most good auto repair shops, but is more difficult for the home mechanic.

What to Do If Your Car Turns Over But Won't Start

If your car DOES turn over but your car won't start then everything gets harder. The reason for this is that there are WAY more things that can cause a no start when the car will turn over but not start. The most common causes for this type of problem are:

Fuel pressure, camshaft sensor, crankshaft sensor, ignition problems, etc.

Testing these components can get very technical so my recommendation is to take your car to a good repair shop. Many times people just start replacing parts, and end up spending a lot more money that it would have taken them to just take it to a professional to have it diagnosed.

If your car will crank (turn over) but not start then it COULD be just a sensor problem. The camshaft sensor or crankshaft sensor. These sensors give the computer the information it needs to calculate ignition timing, the amount of fuel needed, etc. so if these sensors are not working it can cause your car not to start.

If your car won't start it is VERY UNLIKELY that there is any major damage. It is possible that there is internal engine damage, but it is very rare. If you suspect that there is you should take your car to a reputable repair shop to have it diagnosed because you want to BE SURE that there is damage before you have to spend a lot of money to have it fixed.


DNT Tools edited

web:nbdntools.com